Suggerimenti nelle cassette di nidificazione per ara
Il nido per ara è spesso un aspetto dell’avicoltura che viene trascurato. Ciò è dovuto principalmente agli allevatori che utilizzano cassette di nidificazione tradizionali costruite con pannelli o compensato o con elementi comunemente disponibili come botti di legno e fusti di metalli. Sebbene questi tipi siano stati usati con successo per allevare le are, sono afflitti da problemi.
Le cassette nido in legno non durano a lungo a causa della capacità di masticazione degli ara e, a meno che non si aggiunga legno duro molto spesso, non durerà a lungo e causerà interruzioni a causa della sostituzione. L’uso di legno duro comporterà nidi molto pesanti che, se non installati, possono diventare pericolosi sia per i pappagalli che per l’allevatore. Se si utilizzano assi di legno, ciò può consentire a troppa luce di entrare tra le assi e scoraggiare l’annidamento. Il legno incoraggia anche gli insetti, la crescita dei funghi e non è possibile disinfettare adeguatamente senza eliminare il rischio che gli uccelli possano ingerire sostanze chimiche dalla masticazione del legno.
Le cassette di metallo hanno alcuni dei problemi simili che ho citato con le scatole di legno, uno è che anche loro sono pesanti. Altri svantaggi sono che possono diventare molto caldi, il che può portare a scoraggiare la coppia dall’entrarvi o alla morte di embrioni nelle uova o nei pulcini nati. Gli spigoli vivi lasciati nel processo di fabbricazione del nido possono anche tagliare la pelle degli uccelli.

Sulla base della mia esperienza maturata negli anni negli allevamenti di ara, so che un nido di successo deve soddisfare i criteri di base affinché una coppia sia riproduttiva. Alcuni di questi aspetti sono:
- Le are, come le altre psittacine, non amano la luce eccessiva nella camera di nidificazione.
- Alle ara non piace vedere le persone quando sono nella scatola.
- Le ara devono capire che è una cassetta di nidificazione e che possono entrare e posare senza paura
- Il disturbo dall’ispezione del nido deve essere minimo.
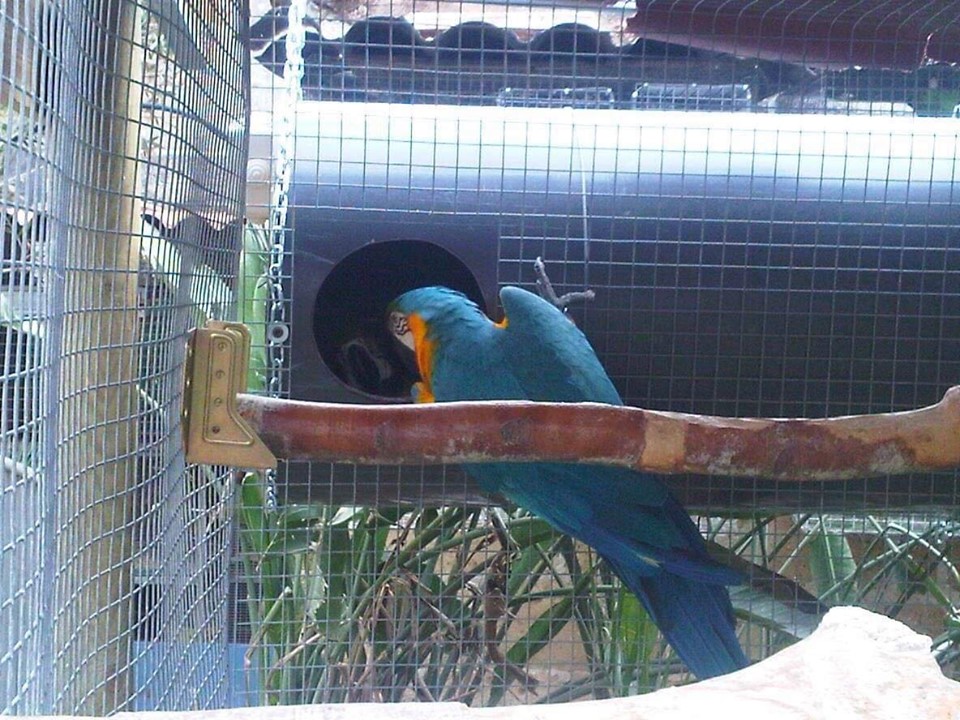
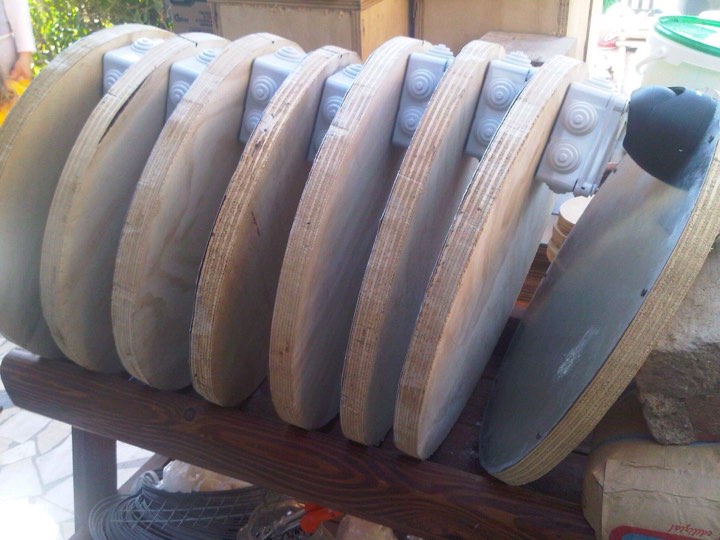
Tenendo presente questi criteri che ho menzionato sopra, ho iniziato a progettare un nido orizzontale privo di svantaggi ma focalizzato sui vantaggi. Ho iniziato selezionando il materiale, cloruro di polivinile, noto anche comunemente come PVC. È un materiale molto duro e può resistere alle are che lo masticano. È relativamente poco costoso se si considera che sopravvive al legno. Il PVC è molto leggero. Infine, puoi lavarlo e disinfettarlo prima di ogni stagione riproduttiva. Dopo aver selezionato il materiale, dovevo scegliere il colore, la dimensione e la forma corrette. Ho finito per selezionare il grigio, perché evita che gli uccelli si spaventino dalle ombre che appaiono all’interno delle scatole dagli oggetti all’esterno. Ho scelto un diametro di 50 cm (6 mm di spessore) in quanto è stato un compromesso tra qualcosa di più piccolo che ha rischiato il surriscaldamento degli uccelli e che qualcosa di più grande è troppo pesante, troppo costoso e non pratico. Dopo aver selezionato il materiale, ho dovuto trovare un modo per trasformarlo in un nido. Una volta acquistato il tubo da 50 cm, che normalmente ha una lunghezza di 3 metri, ho deciso di tagliarlo in tre sezioni uguali.
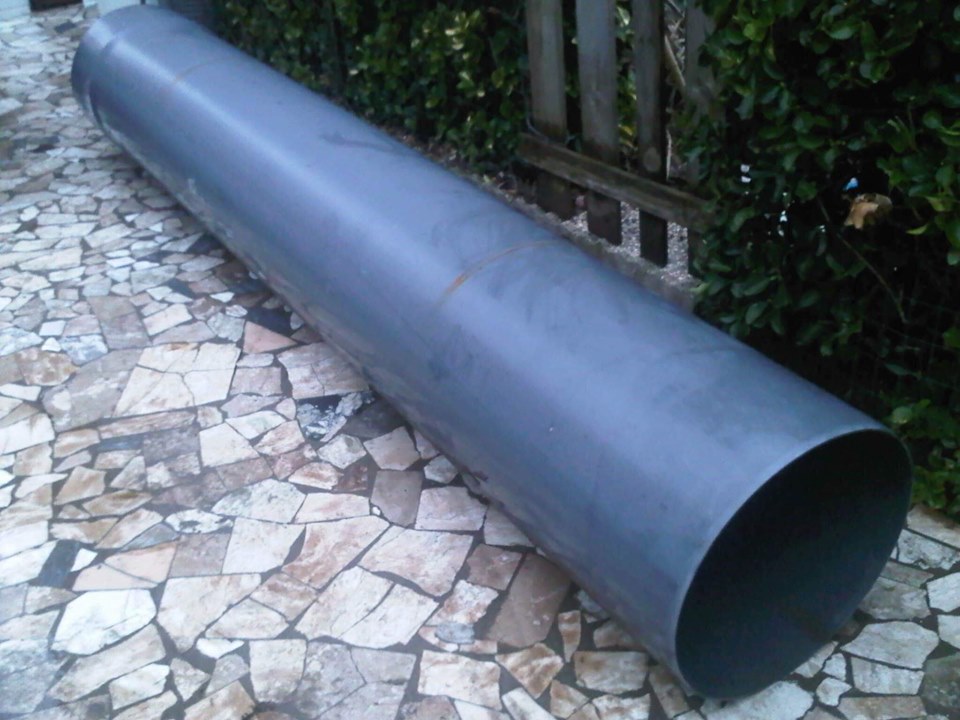
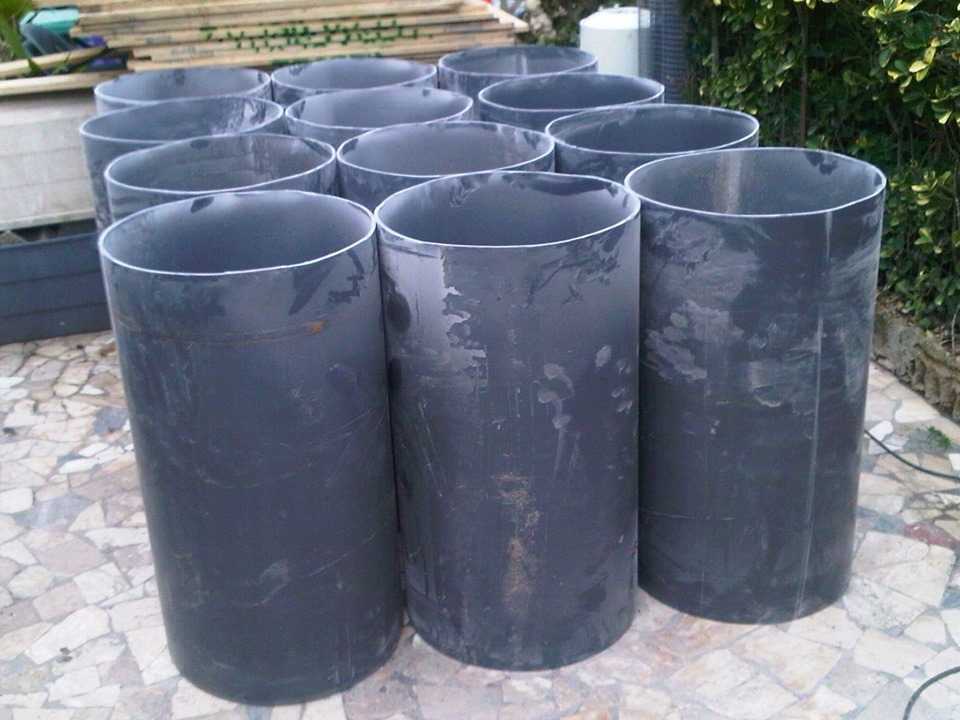
Ho proceduto prima a fare un taglio appena sotto la flangia di 10 cm, poiché non è necessario, quindi ho diviso il resto del tubo in tre parti uguali. Il risultato dovrebbe essere di tre sezioni di circa 90 cm. Vorrei sottolineare per assicurarti di prendere le misure appropriate e utilizzare il nastro protettivo come guida durante il taglio, altrimenti rischi di rottamare un tubo costoso. Ho trovato il modo migliore per tagliare il tubo allo stesso modo usando una smerigliatrice di metallo con una lama molto sottile.
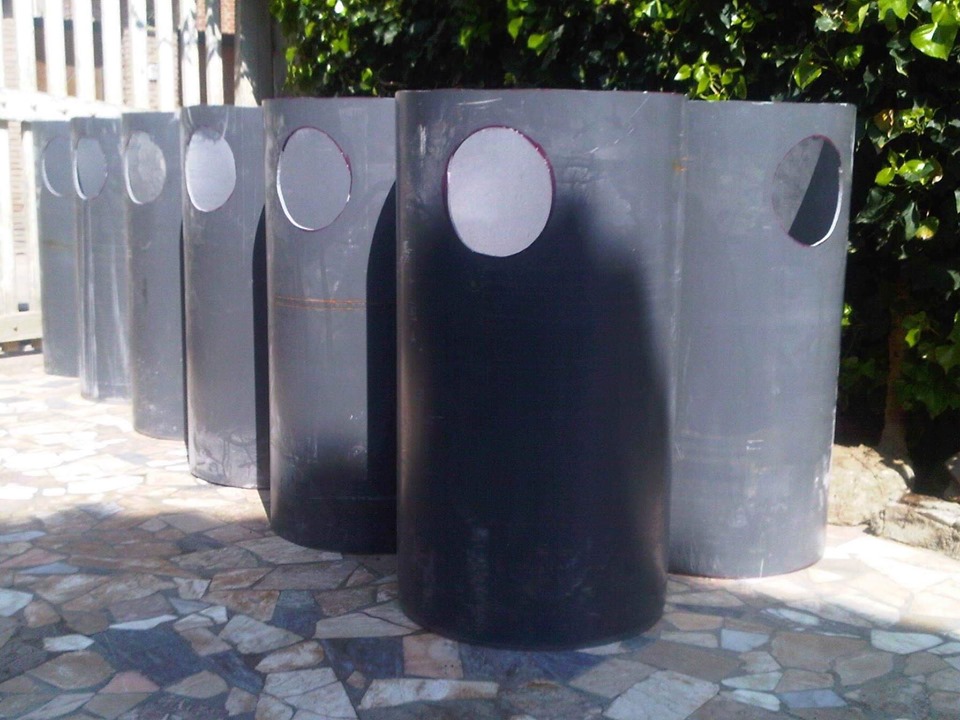
Successivamente, ho proceduto a tagliare un foro di ingresso di 20 cm di diametro. Sono stati scelti 20 cm per compensare il livello di luce e lo scambio di calore. Un buco più piccolo sarebbe più scuro, ma più caldo e viceversa.
Ho quindi proceduto alla realizzazione dei tappi terminali.
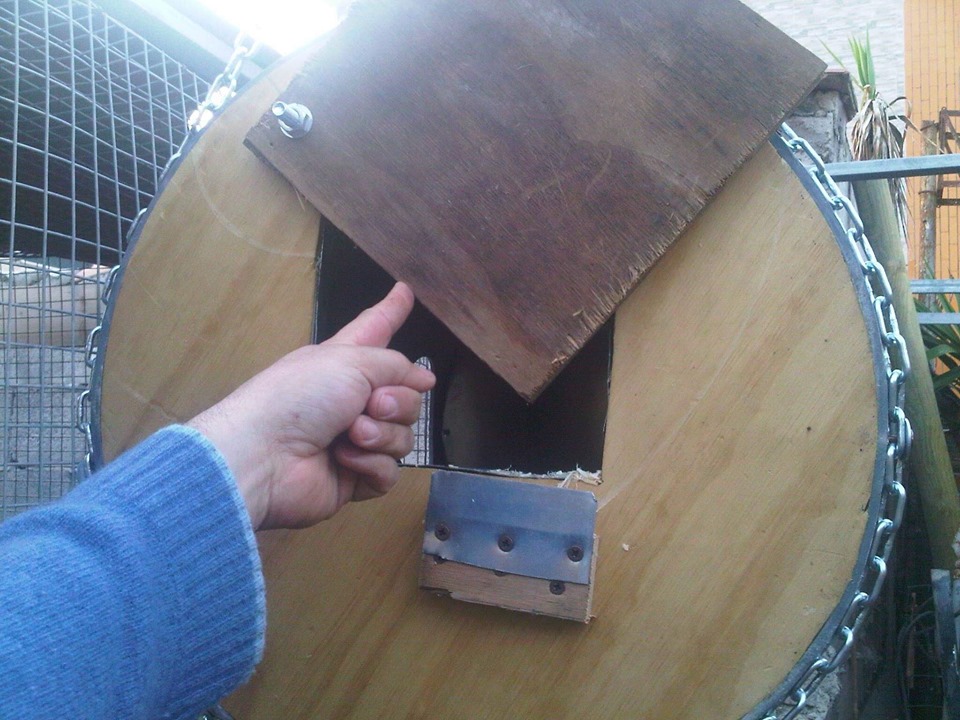
Sebbene i tappi terminali in PVC si trovino in commercio, sono molto costosi. Ho optato invece per una combinazione di lamiera e compensato marino per i tappi terminali.
Ciò è stato fatto tracciando l’interno del tubo sul legno. Quando lo ritagli, assicurati di tagliare all’esterno della linea per evitare di raschiare il foglio di legno. Lo stesso è stato fatto con la lamiera. Fai molta attenzione perché ti può tagliare. Assicurati di archiviare eventuali frese metalliche. Dovrai realizzare due cappucci terminali, uno dei quali è un lato di ispezione.
Per la porta d’ispezione, ho usato il mio stile standard di “ghigliottina” che consiste in una porta, un bullone e un blocco di legno con una piastra di sostegno. Nel vedere la foto, è chiaro come funziona. Le viti mantengono in posizione i tappi di chiusura. Sarà necessario praticare i fori pilota prima di installare le viti. Ho deciso di verniciare i tappi in legno all’esterno poiché le scatole successive sarebbero state parzialmente esposte agli elementi.
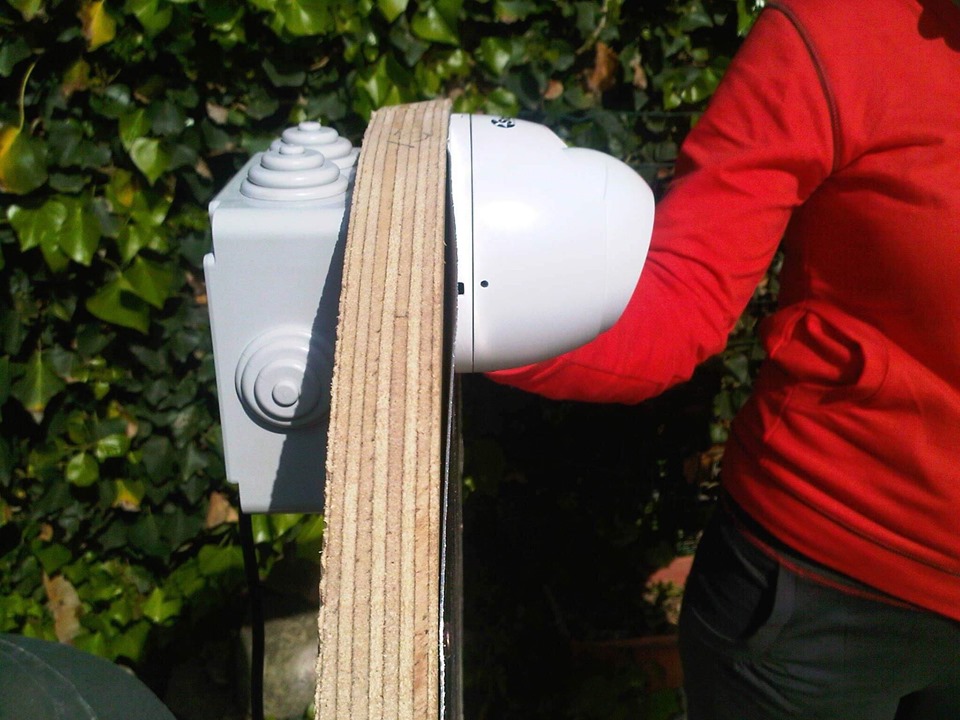
Installo una telecamera in ogni nido. Uso telecamere “antivandalismo” realizzate in alluminio. Si prega di leggere il mio articolo sull’uso dei sistemi di telecamere nelle voliere intitolato “Telecamere, dentro e intorno alle voliere” che sarà presentato in una prossima edizione di questa rivista. Le catene vengono utilizzate per appendere le scatole. Utilizzare almeno cinque viti con rondelle attraverso la catena per fissarla nella voliera.
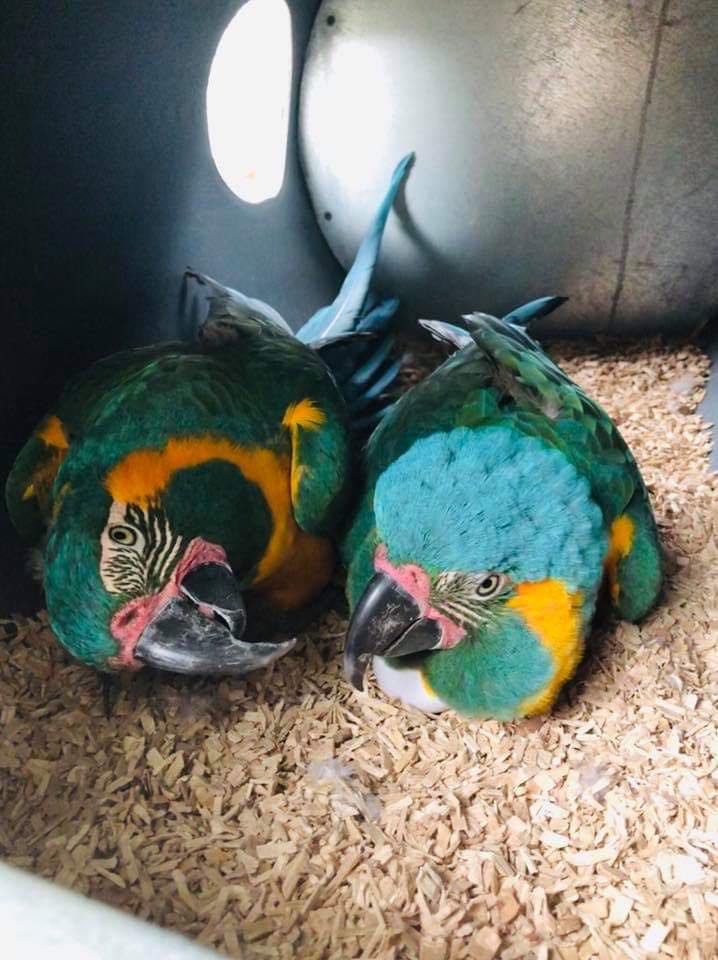
Aggiungo il “fagiolino”come materiale di allevamento nei nidi, comunemente usato per box di cavalli. Ho trovato questo il migliore in quanto non crea polvere nella scatola e crea un pavimento più stabile. Per aiutare a stimolare la coppia, aggiungo anche alcuni blocchi di legno morbido da distruggere.
In conclusione, vorrei dire che noi come avicoltori dobbiamo continuare a spingere i confini delle pratiche standard e pensare più “fuori dagli schemi” e usare la tecnologia a nostro vantaggio in modo da poter migliorare l’avicoltura al livello successivo.

Articolo di Guglielmo Petrantoni su concessione Randy Berry
Impaginazione grafica by GRAFOS SERVIZI GRAFICI – SAN COLOMBANO AL LAMBRO
A revolution in nesting boxes
By Randy Berry
The macaw-nesting box is often one aspect of aviculture that is often over looked. This is mainly due to breeders using traditional nesting boxes built from boards or plywood or from commonly available items such as wooden barrels and metals drums. Although these types of have been used successfully to breed macaws, they are plagued with problems.
Wooden nest boxes do not last very long because of the macaws chewing ability and unless you add very thick hard wood, it will not last long and lead to disruption because of the replacement. Using hard wood will result in very heavy nest boxes, which if not installed problem can become dangerous to both the parrots and the breeder. If wooden boards are used this can allow too much light to enter between the boards and discourage nesting. Wood also encourages insects, fungal growth and it is not possible to sanitize properly without eliminating the risk of the birds possibly ingesting chemicals from chewing the wood.
Metal nest boxes have some of the similar problems I mentioned with wooden boxes, one being that they too are heavy. Other disadvantages are they can become very hot which can result in either discouraging the pair from entering them, or the death of embryos in eggs or hatched chicks. Sharp edges left in the manufacturing process of the nesting box can also cut the birds skin.
Based on my experience over the years of breeding macaws, I know that a successful nest box needs to meet basic criteria in order for a pair to be reproductive. Some of these aspects are:
- Macaws, like other psittacines, do not like excessive light in the nesting chamber.
- Macaws do not like to see people when they are in the box.
- Macaws need to understand it is a nesting box and that they can enter it and lay without fear
- Disturbance from nest inspection needs to be minimal.
Keeping in mind this criteria I mentioned above, I started designing a horizontal nest box that lacked the disadvantages but instead focused on the advantages. I first started by selecting the material, Polyvinyl chloride, also known commonly as PVC. It is a very hard material and can stand up to macaws chewing it. It is relatively inexpensive; if you consider that it outlasts wood. PVC is very lightweight. Lastly, you can wash and disinfect it before each breeding season. Upon selecting the material, I needed to choose the color, correct size and form. I ended up selecting grey, because it avoids the birds from getting scared from shadows appearing inside the boxes from objects outside. I chose 50cm diameter (6mm thick) as it was a compromise between anything smaller that risked the birds overheating, and anything larger being too heavy, too expensive and not practical. After selecting the material, I had to figure out a way to make it into a nest box.
Once I bought the 50cm pipe, which normally comes in 3 metre lengths, I made the decision to cut it in three equal sections. I proceeded first to make a cut just under the 10 cm flange, as it is not needed, and then divided the rest of the pipe into three equal parts. The result should be three sections of about 90cm. I would like to point out to make sure you take the proper measurements and use masking tape as a guide when cutting or else you risk scrapping an expensive pipe. I found the best way to cut the pipe equally was using a metal grinder with a very thin blade.
Next, I proceeded to cut a 20cm diameter entrance hole. 20 cm was chosen to compensate between light level and heat exchange. A smaller hole would be darker, but hotter and vice versa.
I then proceeded to make the end caps. Although PVC end caps are found in commerce, they are very expensive. I opted instead to use a combination of sheet metal and marine grade plywood for the end caps. This was done by tracing the inside of the pipe over the wood. When you cut it out make sure to cut on the outside of the line to avoid scrapping the wooden sheet. The same was done with the metal sheet. Be very careful as it can cut you. Make sure to file down any metal burs. You will need to make two end caps, with one being an inspection side. For the inspection door, I used my standard “guillotine” style that consists of a door, a bolt and a wooden block with a retaining plate. In seeing the photo, it is clear how it works. Screws hold the end caps in place. You will need to drill pilot holes before installing the screws. I decided to varnish the wooden end caps on the outside since the next boxes would be partially exposed to the elements.
I install a camera in every nest box. I use “anti-vandal” dome cameras made in aluminum. Please read my article on the usage of camera systems in aviaries entitled “Cameras, in and around the aviaries” which will feature in an upcoming edition of this magazine.
Chains are used to hang the boxes up. Use at least five screws with washers through the chain to secure it in the aviary.
I add Versele Laga 8mm wood as breeding material in the boxes. I have found this the best as it does not create dust in the box and creates a more stable floor bedding. To help stimulate the pair, I also add some soft wood blocks for them to shred.
In conclusion, I’d like to say that we as aviculturists need to continue to push the boundaries of standard practices and think more “outside the box” and use technology to our advantage so that we can enhance aviculture to the next level.
BERRY BROTHERS AVIAIRIES